home tutorials features parties custom orders

Tuesday, July 31, 2012

Clothes Sizing and Care Labels + Offer


As you all know, I love to make cute clothes for my daughter.  In fact, I'd say that 75% percent of her summer wardrobe are items that I have sewn for her. But with so many pieces now in her closet, I'm finding it difficult to remember the size of each one.  The solution--start sewing sizing labels into the clothes I make.

So last week, I searched Etsy for sizing and care labels, looking for a shop that had the style of label I wanted and offered them in small quantities for a fair price.  It took me longer to find a shop that met those criteria than I thought it would, but eventually I came across Forever Threads.

I chose a variety pack of 100 labels and was able to choose up to 10 different labels with a minimum quantity of 10 per label type, all for under $8 including shipping!  How awesome is that?!


You can choose from approximately 25 types of care labels and over 100 size labels!

ForeverThreads Labels
Photo of labels offered by Forever Threads
These labels are woven labels with finished edges and have the lettering woven into the label. They are super soft, too--another plus if you plan on using these in children's clothing.


When I placed my Etsy order, I sent the owner, Rita, a little message asking her a couple of questions about her shop. She messaged me right back, and we began a nice little chat for a few minutes about our blogs and the types of clothes we make.  Then the next day, Rita sent me a message saying she wanted to mention sewVery on her blog, and she also offered up a super discount to her shop for any of my sewVery readers!

Here's her offer:

Order labels from her shop, Forever Threads, during the month of August, and she'll double the labels in your order! All you have to do is mention sewVery in the comment box along with the quantity and label type you want to order.

How sweet a deal is that?! I think I may have to order more myself.


And while your in her shop, check out the other great items that Forever Threads offers. They specialize in items for making heirloom quality children's clothing, including lace, trim, buttons, and fabric.

I'm so glad I came across Rita's Etsy shop, Forever Threads.  I hope you'll take a look, too!


Friday, July 27, 2012

Feature and a Favor


Late yesterday I came across this wonderful post from my friend, Janelle from Emmaline Bags, who blogged about a couple of things I've made recently. What a surprise!  Thanks again, Janelle!

To read her post and to check out her blog, click the highlighted links above.

Emmaline Bags Shop
Also, if you love to make bags, then you should really purchase her patterns. I own all three and have made two so far, and they are the best!  She also offers for sale the hardware she prefers to use when making these bags.

She's having a sale right now, too, so be sure to enter the code POLARBEAR at check out to receive 20% off your purchase when you buy 2 or more items now through August 15th.

I'll be guest posting over at Emmaline Bags in early August, but don't worry, I'll post a reminder when it's up.

On another note, today begins the voting for viewer's choice over at the Shorts on the Line event.  As you know, I've made several pairs of shorts this month, but the pair of mine I feel has the best chance of getting the most votes is the Oliver + S Class Picnic Shorts.


These shorts are #57, and you can vote once a day this Friday, Saturday, and Sunday. I would really appreciate you voting for me each day!  There are some awesome prizes for the winner!

In case you missed it, here's the link to the voting page.

Thanks so much everyone for your support!  Hope you have a great day!

Wednesday, July 25, 2012

Ruffle Neck Romper Tutorial


Well, several of you asked for it, so here it is!  (Now, just imagine party horns blowing and balloons falling from the sky)!


I finally put together a tutorial on how to make a Ruffle Neck Romper like the one I made here a few months ago.  I apologize for it taking me so long to finish, but better late than never.  Right?!

First of all, let me just say that I am excited to have readers and followers of the blog so interested in something I've made that you want to know how I did it.  That's just so cool!

I first got the idea to make a Ruffle Neck Romper when I saw this one in a Kelly's Kids Catalog a friend gave me.


Kelly's Kids Play Date Romper 

I then looked through all the store bought and e-patterns I own to see if any had a ruffle neck feature so I could read the directions on how to do this, but to my disappointment, I didn't have one.  Then I searched online and only found a couple (at the time) of e-patterns offered for sale, but I kept thinking to myself that it couldn't be that difficult to make.  I mean, it's just a pretty basic peasant/pillowcase top pattern with a ruffle added on.  So I went to bed that night and fell asleep trying to figure this out, and when I woke up the next morning, I had it!

I then remembered seeing a pattern in my stash for a cute little pillowcase style romper that I had purchased at Joann's when they had Simplicity patterns on sale for 99 cents.  I hadn't tried it out yet, but all that was about to change!  The pattern was Simplicity 1903 View C.


I'm sure other romper patterns would work for this as well, but this is the one I happened to have on hand.

Ok, are you ready to get started with how I took this Simplicity pattern and made it into this adorable Ruffle Neck Romper?


Here we go!  

The first time I made this romper, I cut out the pattern using size 4T for Ella. At the time, that is what she had been wearing so I thought it would be a perfect fit.  Some things I didn't take into consideration though were how the shirred waist and the elastic in the ruffle neckline would make the romper rise up.  Although the first romper fit, I always felt like it was a little short in the rise, so to remedy this, I decided to cut out the pattern this time using the size 6 pattern (keeping in mind that the finished romper will be a size 4T)! And I must say that the newest romper fits like a dream.  I'm much more pleased with the fit than I was with the first one.

So, I would definitely recommend cutting out at least one size larger than you would normally if you are using this pattern for this Ruffle Neck Romper version.

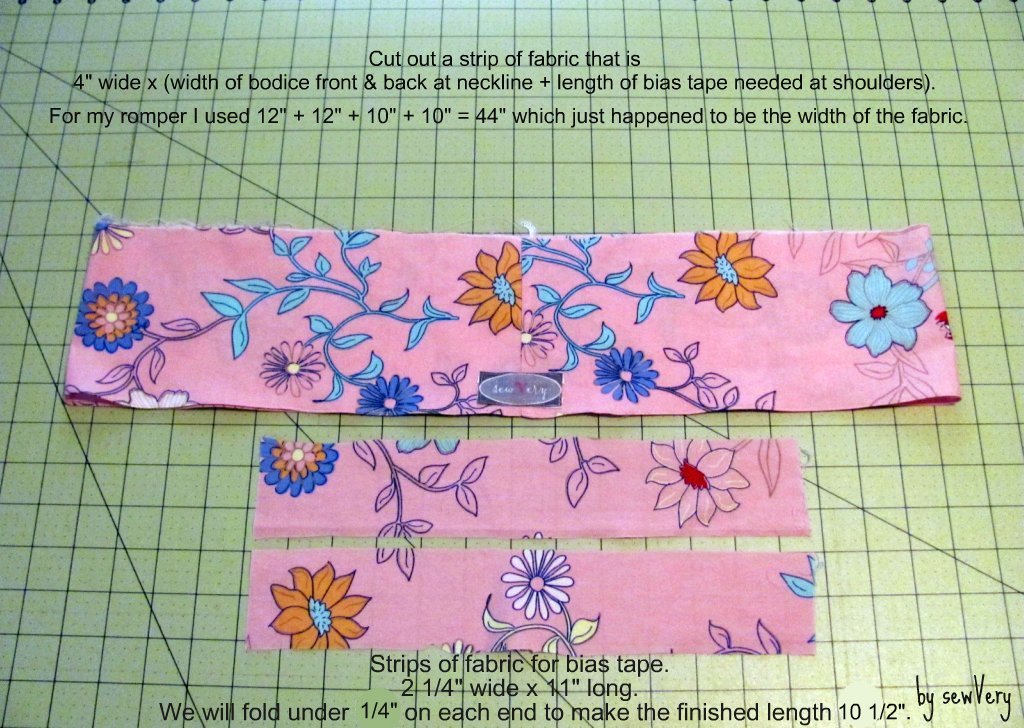
Also, I didn't want the top to have a seam down the middle, so I cut out the top front and back on the fold of the fabric.  Just remember to exclude the seam allowance for this center seam (5/8" + 5/8" = 1 1/4") at the fold (not at the side seams).  

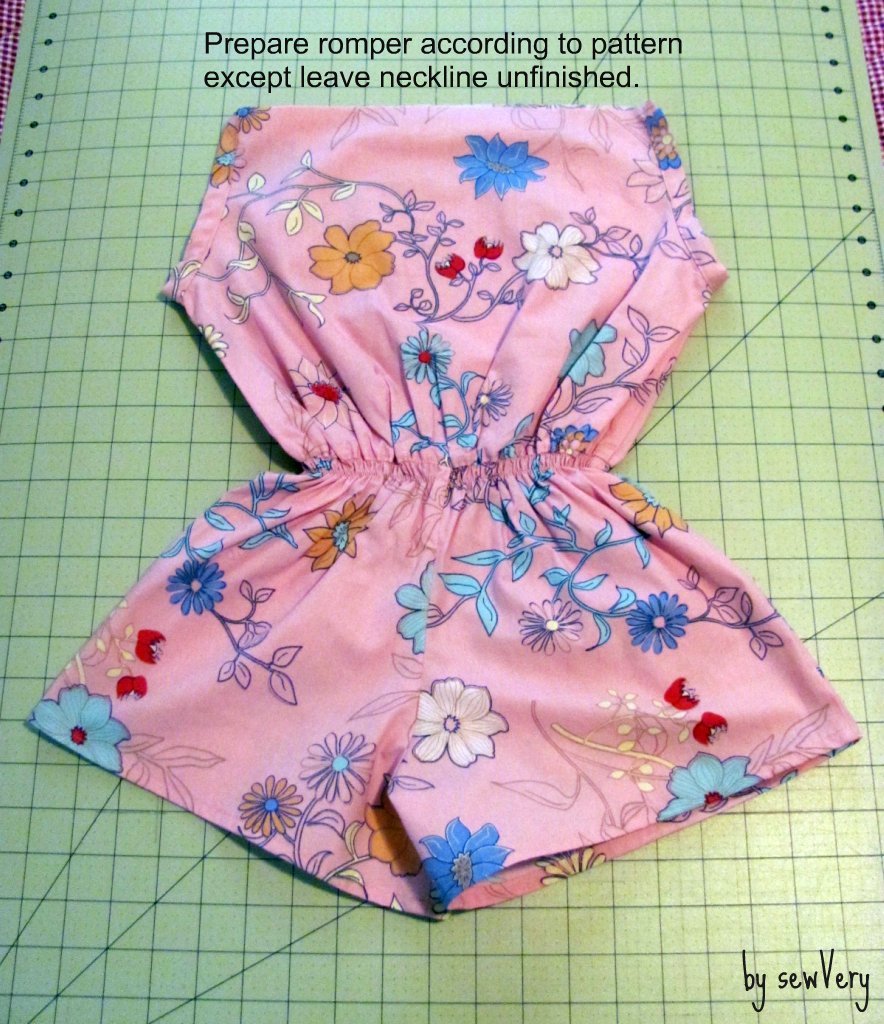
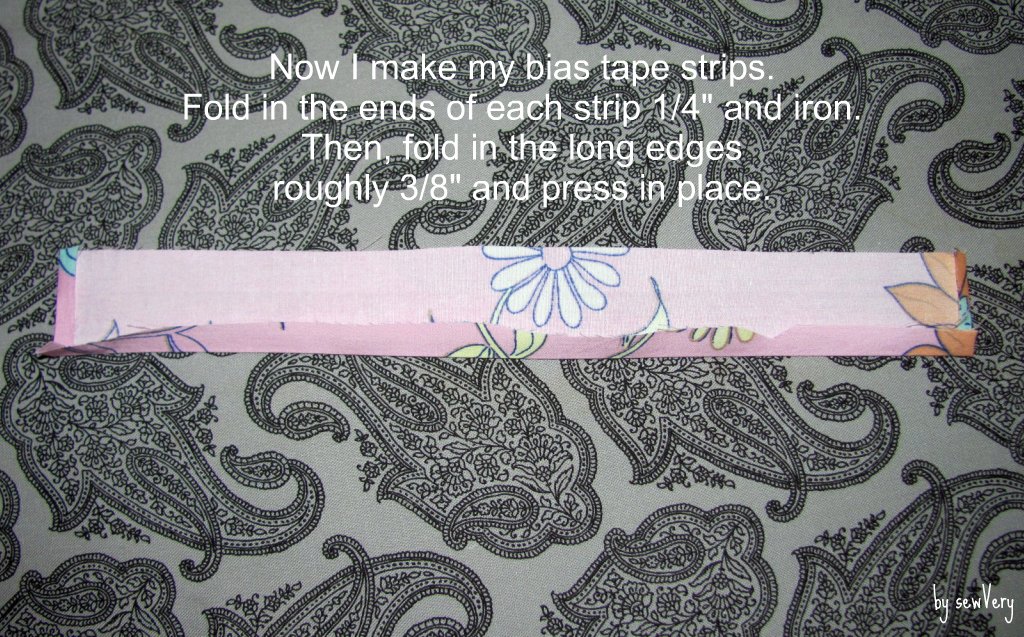
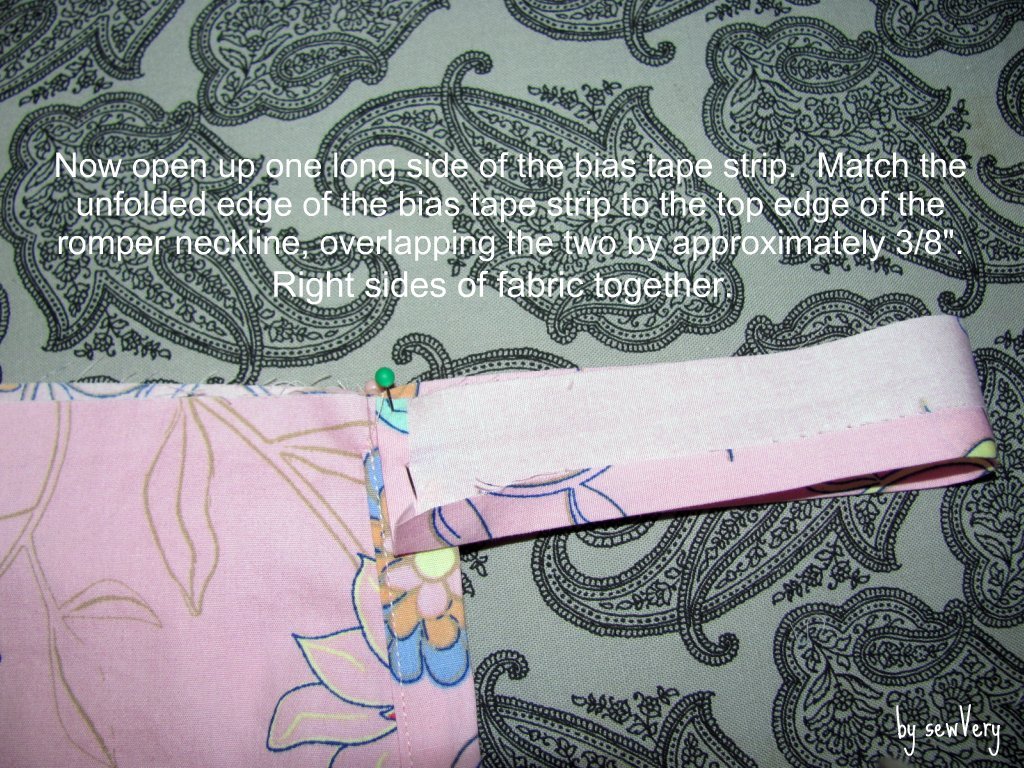
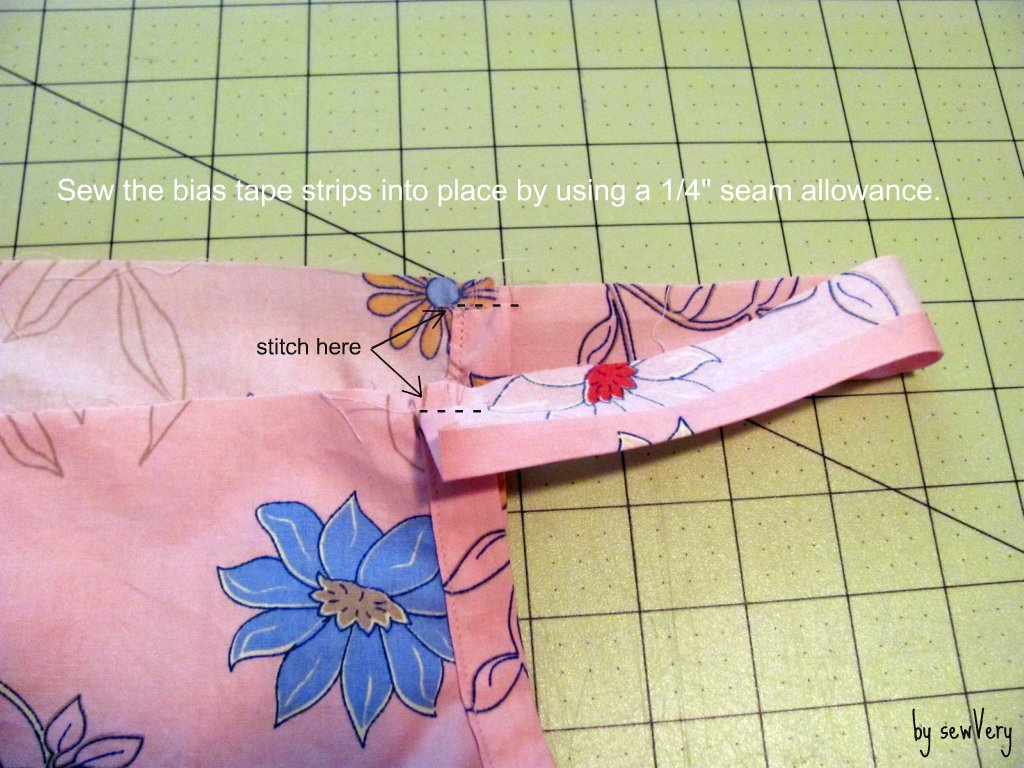
Now, sew the romper according to the pattern directions except leave off the ruffle around the waist, don't hem the neckline, and don't put in elastic on the leg openings (unless you want to).  

I added two rows of shirring (spaced 1/2" apart) at the waist seam to cinch the romper.  I strongly recommend using Stretch Rite elastic thread for your shirring.

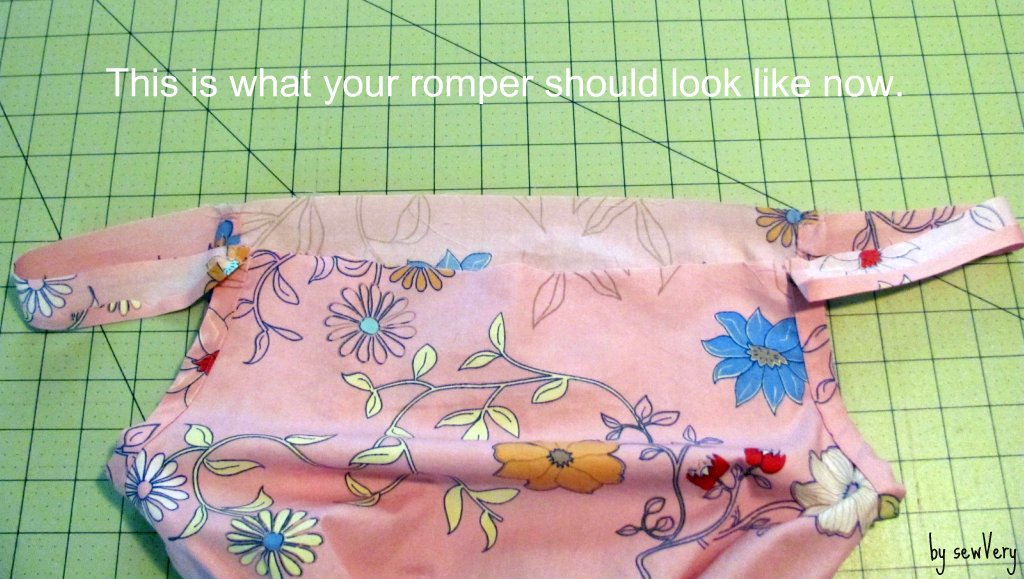
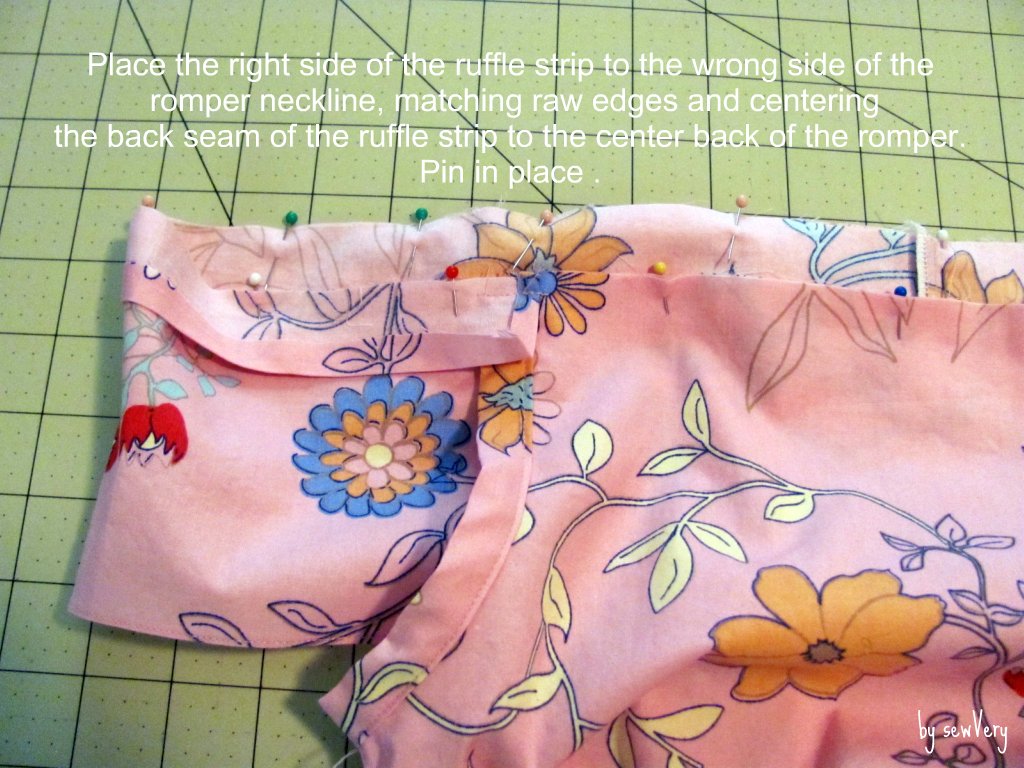
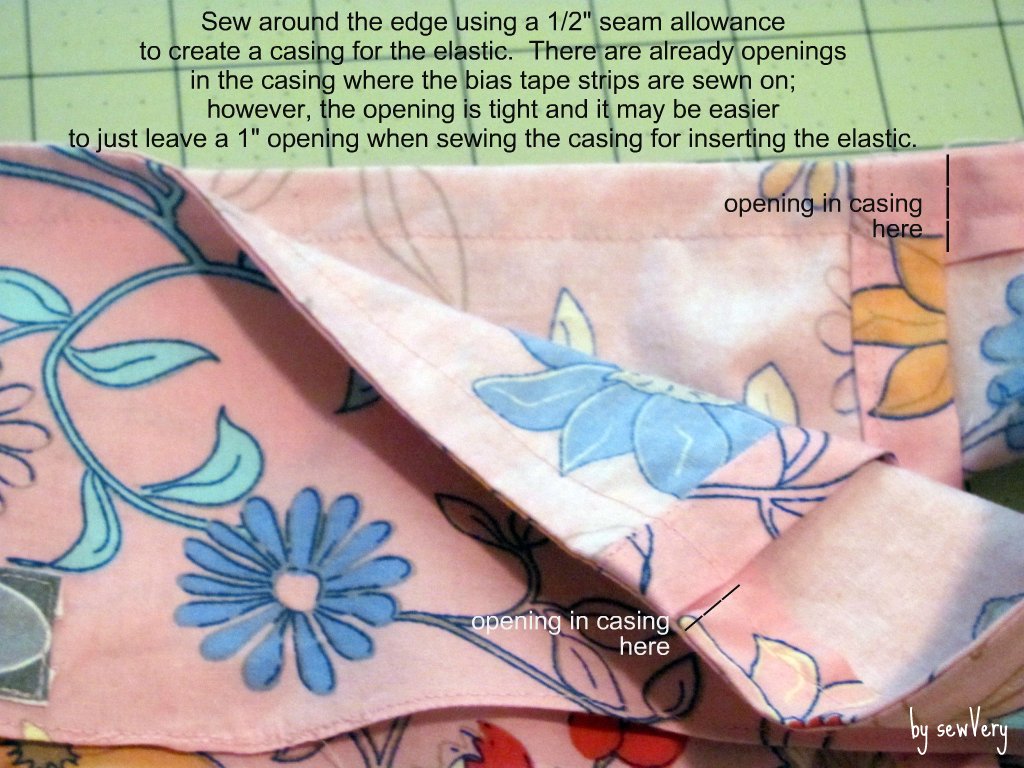
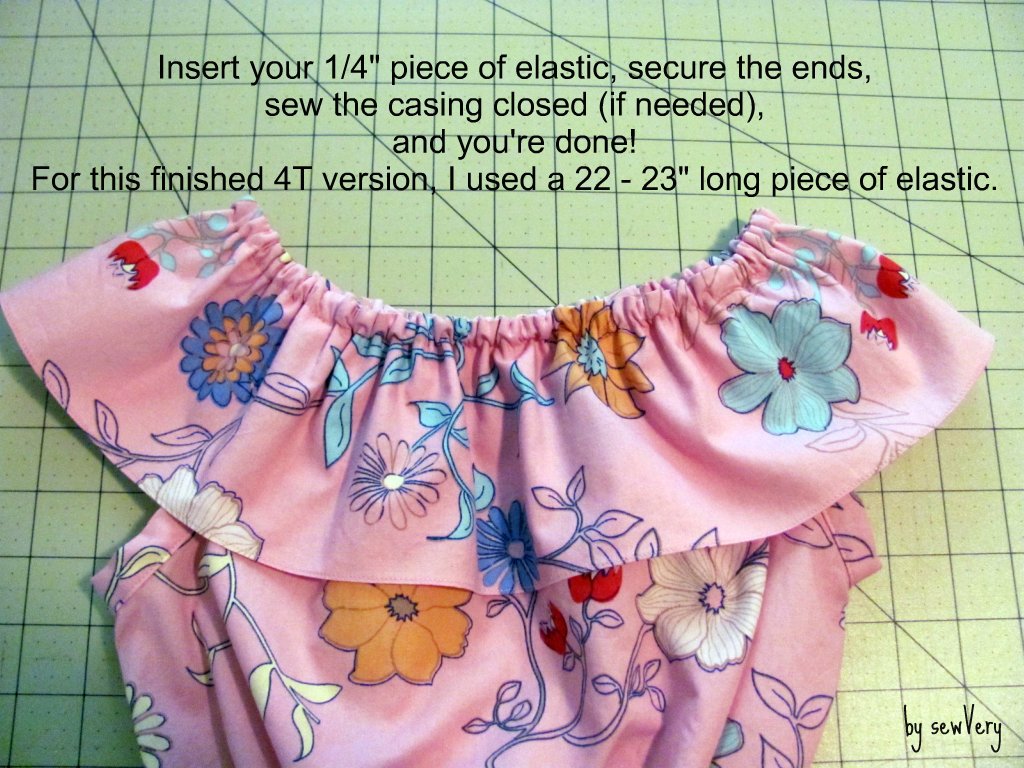
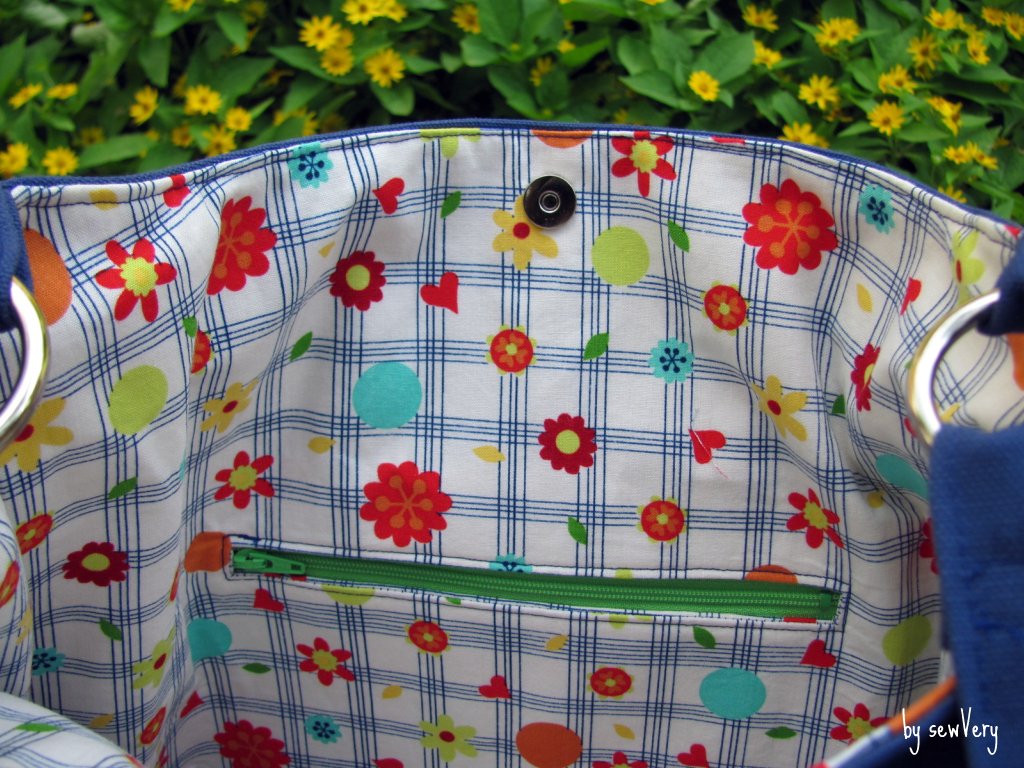
This is now what your romper should look like.


Wasn't that so much easier than you thought it would be?  Now you know how to add a ruffle neck to any basic peasant top or dress pattern or even just a basic pillowcase dress pattern.  


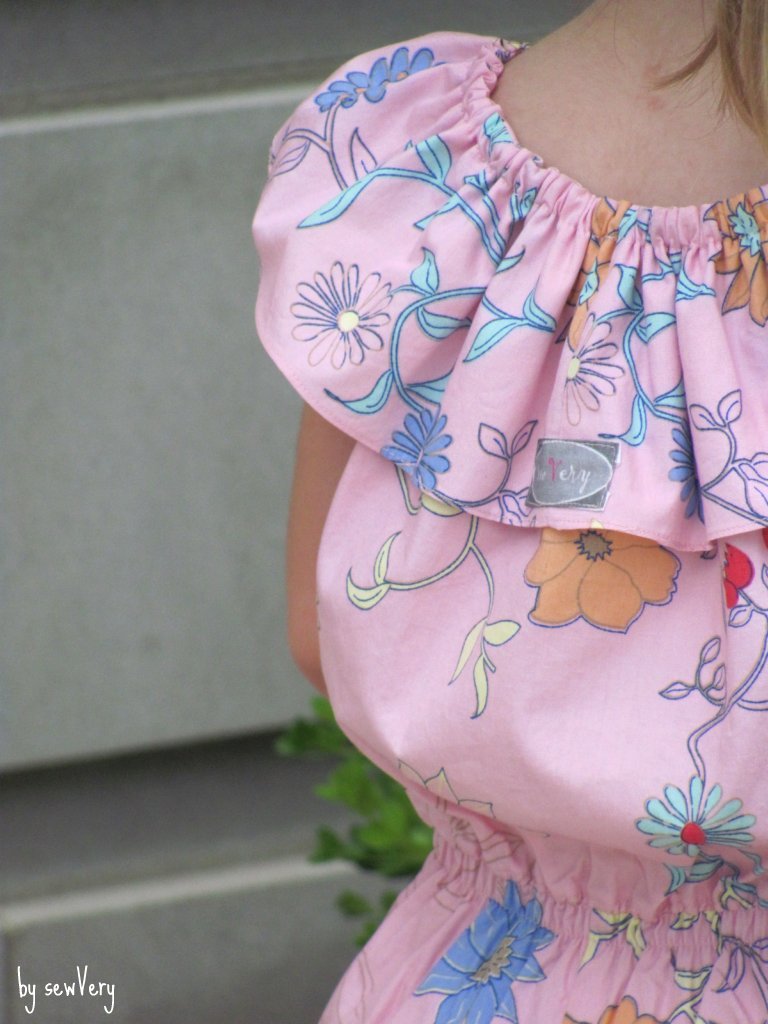
And the width of the ruffle can be easily adjusted to fit your taste or style.  I just like the look of a 3 to 3 1/2" ruffle on this romper.  Any wider and it reminds me of a clown for some reason!

Oh, and if you are wondering about the fabric, it is a Little Lisette fabric called Watercolor.  I purchased it from Joann's off the clearance isle.  It's so soft and smooth feeling and the perfect weight for this outfit.  My daughter loves the pink and the flowers.


If you decide to make one of these lovely rompers for your lovely little girl, please send me a photo when your finished.   My email is sewvery(at)gmail(dot)com.

Thanks for stopping by!  

This tutorial if for personal use only and it may not be reproduced or copied in part or whole without my expressed written consent.  

Friday, July 20, 2012

oliver + s Picnic Blouse & Shorts


I know you have probably seen reviews of this Oliver + S Class Picnic Blouse and Shorts pattern before on other blogs.  It's really a great pattern--great instructions with lots of helpful tips, sizing is spot on, and of course, just adorable and unique features!


When Rachael from imagine gnats asked me to participate in Shorts on the Line as a guest blogger, I wasn't sure I would be able to pull off the scalloped edge shorts idea that was my original plan, so she kindly offered up this super Oliver + S pattern for me to try out as a back-up!  This is the one and only Oliver + S pattern that I now own (and I would love to have more), and I am so appreciative to Rachael for sending it to me!


I purchased the Spring Street fabric by Carolyn Gavin for P & B Textiles last year with the intent on making Ella a cute little shorts and top outfit, but I never found the right pattern.  After receiving the Oliver + S Picnic Blouse and Shorts pattern in the mail though, I immediately knew that this was the perfect fabric for this outfit.  I even had some of the lightweight denim on hand, so no trip to the fabric store was necessary for me to get started with this project.  Don't you just love it when everything for a project comes together so naturally?!


I used the measurement guide on the back of the pattern to help me determine the best size to use, and Ella's measurements fit the size 5 almost perfectly.  I am hoping this outfit will still fit next summer especially since I used the adjustable buttonhole elastic for the back waistband.  The pattern guides you through exactly how to make the waistband for this type of elastic if you choose to use it, but it's not a requirement of the pattern.  Overall, the shorts were pretty simple to make!


The blouse was super simple to make.  It has a little elastic at the top of the shoulder giving the neck opening enough stretch to make it easy to put on and take off.  I think the blouse with the 3/4 length sleeves will be more appropriate for spring or fall since it is so hot this summer, so next time I may make it a short sleeve blouse.


Ella loves the entire ensemble.  I do, too.  I've already got plans to make a pair or two more this summer! You should definitely try out this pattern if you haven't already. Thanks again, Rachael!


Tuesday, July 17, 2012

Emmaline's Steph in the City Bag


Last month during Purse Palooza, I purchased two new purse patterns from Janelle over at Emmaline's Bags:   the Teardrop Bag pattern and the Steph in the City Bag pattern.   You see, I had won her other bag pattern, the Emmaline Bag, in a contest a few months back and just loved the pattern and the finished bag I made using it.  I knew I had to buy her other patterns, so when she released her latest, the Steph in the City Bag, I jumped on the chance to purchase them.


Since the last purse I made was very bold, I decided to tone down my fabric choice this time and make (at least) the exterior in a solid color.  I had also never sewn with duck cloth before, and I figured this would be the perfect opportunity to give it a try.  To my surprise, the duck cloth was fairly easy to work with and in the end made for a lovely purse.


For the interior, I used a fabric from the Hugs & Kisses collection by Henry Glass Fabrics.


To add a little color to the exterior, I added this vintage piece of trim to the belt.   I think it was the perfect addition to the bag!


As in the previous review that I did of Janelle's Emmaline Bag, I have no complaints about her latest pattern for the Steph in the City Bag.  Every step of the construction is described in great detail and accompanied with multiple color photos.  Again, she's made one of the best patterns I've ever seen!

With each new bag I make, my confidence in bag making grows.  This time I wasn't nervous at all about installing a zipper pocket or top stitching around the top through all that fabric thickness.  I tackled this project like I knew exactly what I was doing and finished it all in one afternoon!


I highly recommend you try Janelle's patterns (I was not paid to say this--it's my own opinion), and I look forward to making my third one, the Teardrop Bag very soon.  If you are an experienced sewer, or even an advanced beginner, then you will not have a bit of trouble making any of her bags.  Trust me!

Happy sewing!